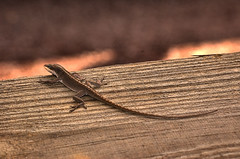
I was at the local state park the other day in hopes of catpturing a few bluejays on film (ok digital sensor). While standing near the kiosk out front of the ranger shed talking to one of the park rangers, this little guy caught my eye. The thing is had I not been looking and I mean seeing photographically, I would never have even seen this green anole. He blended in with the wood so well that he was almost invisible. In fact, the ranger I was talking to didn't even see him when I abruptly left our conversation and started toward the sign camera raised.
Always take the time to "see" what is around you.
Tuesday, March 8, 2011
Right place: Right time.
What is the hardest part of photography? Being in the right place at the right time.
Learning composition rules and techno speak is the easy part. I mean seriously anybody today can pick up a camera and with a little bit of knowlege make a good image. Of course, getting great images consistantly means you do have to understand the rules of photography and how to apply them. For some that happens with out even thinking about it, and for others it's a learned skill.
That still leaves us with the hardest part of photography. Being in the right place at the right time. Why is it so hard? Simply put, because you have to put effort into doing the research. You have to be commited to getting up at un godly hours of the day to get where you need to be to get the perfect light. You have to know your subject. You just have to put the work in. But perhaps the hardest part of being in the right place at the right time is: LUCK!
That's right. sometimes you just have to be lucky.
Saturday, February 26, 2011
Why you should always carry your camera with you.
Just a short entry tonight but one worth sharing and repeating again. Always, always carry your camera with you. You never know when the oppertunity for a photo will emerge. Take today for example. Made the trip over to Augusta, GA to pick up a new tripod and have supper. We stopped at Sconyers BBQ (great food by the way if you haven't been, and if you haven't you must make it a point to go). Anyway, there is this nice little feeding pond there and well since I had my camera with me.............
Point is if you don't have it with you, you can not take advantage of oppertunities.

Point is if you don't have it with you, you can not take advantage of oppertunities.
Tuesday, February 22, 2011
Changing Location for better images.
Changing Location for better images
Have you ever been in a creative rut or just don’t know what to do to improve your images? I have, and I am sure that most everyone out there that has ever picked up a camera has been in that situation. How do you get yourself out of the creative rut then? Lets take a look at one of the ways I get myself back on track.
I call it work the subject. Yes, Sara, if you are reading this I stole it from one of your assignments. Sara, for those of you who don't know; was one of my photography instructors at Prairie View. She taught creative imaging, and while she may have thought I wasn't paying attention; I did learn a thing or two from her. Thank you, Sara.
Now back to the point of this article. When you find yourself in a creative rut, or just can't seem to get better pictures; try working the subject. Another way to think of this is changing location. I've included 37 images from today as an example. I recommend, however, that you shoot at least 100 or more when you first try this. The object is to simplify, simplify, simplify. Today all of the images were taken with a Nikon D70 and a 24-120 G VR lens set at 24mm. I shot on aperture priority f/22 -1/3 EV and manual focus set to hyper focal. Why you might ask? This exercise is meant to stimulate your creative juices in your compositions not bog you down in the technical aspects. I suggest you do the same. The lens choice doesn’t matter I could have just as easily used a 50mm or my 300mm. I chose the 24-120mm set at 24mm because that is my current lens of choice and the one I must force myself to be creative with. Those of you that know me, know that my philosophy for years has been there is no such thing as too long a focal length. Well, times change. I still love the “big” lenses, but I've decided now that I want wider. The wider the better, and since 24mm is my current widest then 24mm it is.
This exercise is very simple now that we have the who, what and where's out of the way. Well, almost. The who part hasn't been discussed yet. This is completely up to you, however, pick one subject and work it. The more mundane the subject the better. This will force you to get creative in your compositions, and allow your juices to start flowing.
So here we go: Your assignment is to pick a subject and work it by changing your compositions.
Shoot at least 100 frames of well composed images. (Don't just go snapping away. Put some thought into each frame.) Shoot High angles. Shoot low angles. Move a few inches up, down, left and right. (Move your entire body not just swing the camera). Walk around the subject. Notice how the light changes and plays on it. Shoot it from every angel you can think of, and some you may never have thought of before. Get up on a ladder (step stool), down on your knees and lay flat on the ground. Take frames the way you normally would and then compose the subject at a different height. Just keep working and thinking about the compensations. Remember at least 100 frames; 200 would be better.
Now let's look at the examples below. Pay particular attention to what works and what doesn't work in each frame. Note how the light changes. Note the which elements lend to the subject and which ones detract from it. Leave comments below as to what you have noticed so that we can have a healthy discussion about it. We can all learn from this even if the images will never make Nat Geo. Later I will set up a group on Flickr so that you can upload your images for discussion. (There will be a limit for the group of 20 or so just for space considerations.) Do the same with the photos you took and then keep them in your personal library for later reference.
OOPS: The photos didn't load so I created an album here. Please visit the album and then leave your comments back here. Thank you, Ken.
Monday, February 21, 2011
Inspiration comes at the strangest of times
Inspiration comes at the strangest of times. The two images shown here are from my adventures around the yard today. I had gone out just to snap a few to get my creative juices flowing for some HDR images as part of my HDR article. What happened instead was the idea for two completely new articles. Stay tuned.


Example of HDR
This is an example of a HDR image. Although it may not be what you have come to expect according to the current "modern" definition. This image is a single exposure that was manually manipulated or tone mapped in GIMP. Translation: I didnt use any of the special HDR software available to increase the dynamic range of the "print".
For the sake of discussion I am defining print to mean the final output intended for the image.
For the sake of discussion I am defining print to mean the final output intended for the image.
HDR Images: Part One
Okay, let's get this new adventure started shall we. I've been sitting here with writer's block for hours deciding what direction to start off in.
Recently I've been in discussions with other photographers about the merits or lack of merits in HDR images. This seems to be a hot button topic these days with the line firmly drawn in the sand. The question I propose is why are so many ready to discount any tool at their disposal so quickly? Perhaps the answer lies in a misunderstanding of what HDR is and can do for us. This by no means is say that you must use or even like the idea of increasing the dynamic range of your images. However, summarily discounting the practice as having no place in photography or as a mere passing fad is quite frankly downright ignorant. Now before you go and get mad at me for that statement please read on.
HDR or high dynamic range is not a new concept, and to paraphrase an instructor of mine, “There is nothing new under the sun in photography only new ways of applying techniques.” The HDR technique has been around since 1850. Yes you read that right, 1850. Pioneered by Gustave Le Gray to fix the extreme luminance difference between the sky and the sea by combining to negatives into a single positive print showing detail in both areas. Charles Wyckoff took this a step further in the 1930's and 1940's by locally tone mapping images. In the mid 1950's (1954) Wyckoff's nuclear explosion image graces the cover of Time magazine.
 copyright Time Life
 Then there is arguably the most famous HDR photographer,Ansel Adams. Mr Adams took dodging and burning to an entirely new level to squeeze out every last ounce of detail in the highlight and shadow regions of his prints. He also gave us the system by which he accomplished this incredible range of printed tones. That system is more familiarly known as: The Zone System.
With the advent and increasing popularity of color photography, tone mapping in the darkroom became impractical. The timing required was beyond the abilities of us mere mortals. Film manufactures continued to improve on the dynamic range their film was capable of capturing but could never achieve the results that black and white film processed and printed in the darkroom could. The limitations on HDR imposed by our technology (or lack of at the time) lead to the acceptance of limited dynamic range images or LDRI, and HDR was pushed to the back burner except for a very few practitioners.
Fast forward to 1996 and the advent of consumer grade digital cameras. The technology was now coming into range for creating color HDR images, but it still wasn't at hand yet. Some will argue it still isn't at hand. To this I say: What an exciting time to be a photographer. We are in the shaping and formation stage of modern HDR. There are no rules, no guidelines and certainly no set in stone accepted uses. What we are seeing is a wide array of images that range from very well done to just plain awful. That is exactly why it is exciting. You will never know how far is too far until you have gone there. Push the boundaries and then when you learn to recognize what too far is you can back off to just right.
I'm going to leave the discussion here for the moment and come back to it in my next article. Let your minds be open to what I have written and please continue the discussion. In the follow up article we will delve into the ideas of what is acceptable and what is not in terms of uses for HDR. This is where it will get heated up I believe and yes, I have a strong opinion on the subject.
Continue to shoot and see the wonderful light.
Subscribe to:
Posts (Atom)